I've always used "Seeed Studio Fusion PCB" to manufacture my substrates. This is the first time I've ordered a substrate from JLCPCB. Then, I was surprised to receive the substrate very quickly even though it was reasonable, so I will introduce it.
JLCPCB
JLCPCB is a substrate manufacturing company located in China. You can also order component mounting (PCBA). As for the PCB manufacturing, it is the same as Seeed Studio Fusion PCB, and at first glance, I felt that the contents of the website and the design rules are almost the same as that.
What's slightly different is that you can choose matte black as the color of the substrate. The Seeed Studio Fusion PCB is a glossy black, while the JLCPCB is a matt black. It seems that it is difficult to mount the black substrate cleanly because the flux is conspicuous when it is hand-soldered, but I think we can make a cool board like the iPhone and Mac board.
Also, with Seeed Studio Fusion PCB, if the substrate size is over 10cm, the manufacturing cost is quite high, but JLPCB is not so high. I found the JLCPCB to be a good choice when I wanted to make a large substrate.
This company also sells electronic components called LCSC.It's like a Chinese version of Digikey or Mouser. I feel like the price of the parts is relatively reasonable. I will try to use it when I get the chance.
Added August 28, 2019. I ordered the parts at LCSC.
End of addition
Create substrate data
Circuit substrate data creation with KiCad

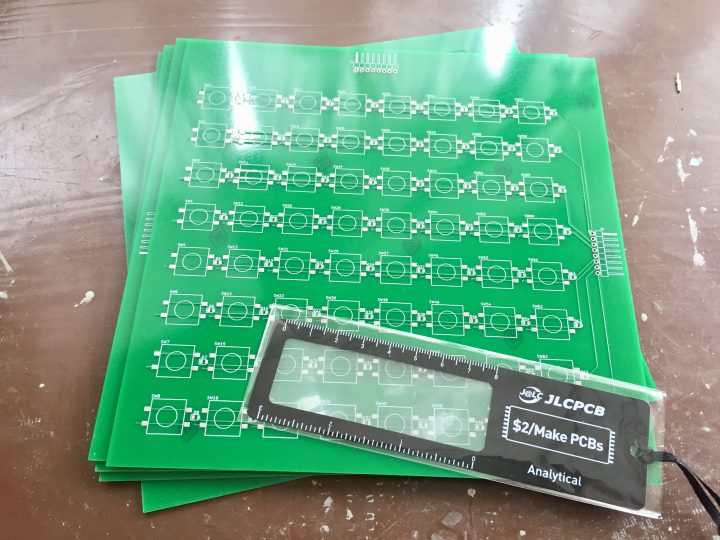
The usual KiCad will be used to create the substrate data. This time, it's an 8x8 key matrix. Line up the 12mm white tact switch, which is also used for the milk carton robot controller. Since the switches are large, the substrate became quite large when I lined up the 8x8.
Output Gerber data

I wasn't sure what format to use, so I used exactly the same settings as the Seeed Studio Fusion PCB to output the Gerber data and renamed the file to match the Fusion PCB. Put these together in a zip file.

Orders to JLCPCB

When you upload the zip file, you can check the Gerber data. Fine. The file is recognized properly.
I didn't need 10 boards, so I changed to 5. Five 19cm x 19cm substrates are $16. It's inexpensive in price ! 
The shipping cost was $13.46 for S.F Express and $17.11 for DHL. I didn't know how long S.F Express would take to deliver, so I decided to use DHL, which is a bit expensive but I think it will arrive soon.
Wonderful speed
Fastest I've ever experienced

- Orders July 18
- Manufacturing Begins July 18
- Ships July 19
- Till July 21

It took me three days to receive my order. This may have been lucky, but it was my first experience with this speed.
Parcels delivered from China to Japan can take up to two weeks at the earliest and over a month at the latest. But this time, it's only three days. On the same day as the order, the parts I had ordered at Aliexpress hadn't even been shipped yet, but the substrate arrived first.
Opening

When you open the DHL bag, you'll see a box.

It's wrapped in a nice cushioning material.

A Magnifying lense came with it as a bonus.


This time I didn't use any fine wiring or parts, so I don't know the accuracy, but it's pretty normal. This may be worse than the Fusion PCB in terms of misalignment and silk printing.

What I found to be better than the Seeed Studio Fusion PCB is that there is no manufacturing ID on the substrate.

In the case of Fusion PCB, ID for manufacturing always enters in the substrate as shown in the photograph above. To avoid this as much as possible, I have recently started to prevent IDs from entering the board by ordering a discarded board that can be separated by a V-cut and having the ID for manufacturing printed on the discarded substrate.
If this is a JLCPCB, the serial number will never be obtained. This is amazing. This may be a coincidence this time too, but I'm happy.
Component mounting

Five days after the substrate arrived, the switch I had ordered at Aliexpress arrived. The shipping costs are a little higher when using ePacket, but they arrive pretty quickly. I use ePacket when I want them to arrive early.

Now that I have all the parts, I will implement them.
Mount the Diode

All switches have diodes to support simultaneous pressing of the switches. I will be implementing the surface mount diodes one by one. Fluxing makes it easier to solder because it allows the solder to get in between the board and the leads nicely.
The flux sold on Amazon, for some reason two pieces are cheaper than one. But it doesn't run out so quickly, so I bought the one that only has one and used it for a long time.
Mount the switch

I mounted 64 of the switches. Whew.
After all the parts are mounted, the flux applied during soldering is removed. I have been using this.
I used to use a different flux cleaner that was cheaper than this. However, when I applied it, the solvent was left behind or the substrate turned white, and although the flux fell off, it turned white and dirty. So, when I used the San-Hayato Flux Cleaner, I was able to drop the flux cleanly without leaving any white stains. It's a little expensive, but I would definitely recommend San-Hayato's flux cleaner because it gives a completely different finish.
Now, once the surface-mounted parts are mounted, all that's left to do is add a pin header to complete the process.
Completion

The 8x8 key matrix is completed.
The first time I ordered from JLCPCB, I was surprised at how quickly it arrived and how low the price was. Next time, I'd like to order a substrate or stencil print with more detailed wiring.


